


How to Make a Purse Form
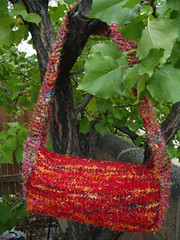
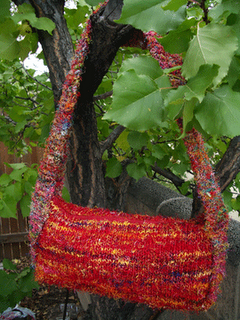
Back? Kind of shapeless, isn't it? Also, being a very loosely spun single, it wants to bias a little, though actually not as much as I'd feared. But, as a purse, clearly not finished.
I searched ABQ for some buckram. Apparently this doesn't exist any more and the blank stares I got when asking for it made me feel like a Civil War relic. I did find some Pellon that was very stiff and about 1/8" thick. I think it's Peltex 70, because the paper they wrapped it in said Peltex 70 and a couple of other numbers. The other numbers were described as fusible, which I did not want. So, Peltex 70. I bought 1/2 yard for around $3.
I set out to make a purse form to give this poor baby some shape. The purse itself it basically a box. I worked it in the round (didn't want to have to seam this stuff), though it might have been stiffer and straighter if I'd knit it flat and seamed it. I hate to seam and I couldn't imagine trying to seam this stuff. If you've knit with it, you know what I mean. When I'd knit a circle as long as I wanted the purse sides to be, I knit the bottom, joining to the sides on either end to form a box. I did a 3 needle (and one crochet hook) bind off to join the bottom and the second side. Thus, a box. Then, I joined a second skein to the base of the sides and knit about a 3" wide band until I was almost out of yarn, then picked up and bound off the bottom of the other side. This was the handle, attached to the bottom, not the top, of the sides. I then machine sewed in a zipper and went looking for interfacing.
To make the form, you need 3 measurements:


the width, the length from one side of the zipper around to the other side, and the width of the flat bottom part.
 Add one inch to the width measurement and mark it on the Pellon. Use the length measurement as is to make the other side of the rectangle. Mark and cut the interfacing. You'll use the third measurement in a minute.
Fold the Pellon in half "like a hotdog" as I used to tell my first graders. Sew 1/2" side seams and trim to 1/4".

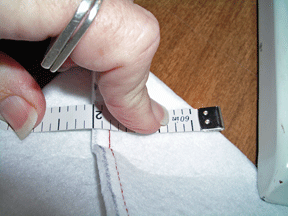
Now, fold the top of the side seam to the inside, to the center of the bottom. Here is where you'll use that third measurement. Find the place across the corner that equals that measurement and mark a line there. In the picture on the right, the line would go along the side of the measuring tape farthest from the corner. Stitch along the line and trim

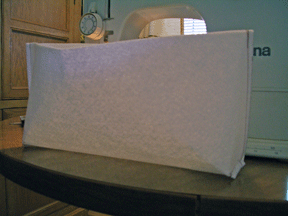
The finished form is firm enought to stand on its own. I think this Pellon is all right - maybe even better than buckram.
Now, put the form inside the purse so that the seams are facing the inside of the purse and sew it to the zipper tape. This is a little tricky - the Pellon is thick enough that the zipper won't zip if it's too close to it. I found it easier to sew with the Pellon side facing my needle. My machine wasn't particularly happy with this procedure, but it's ancient and I think the newer machines are not as fussy.

Trim the Pellon close to the stitching and trim away all those loose threads from the sari yarn that are in the path of the zipper.
Next, I carefully fitted the handles to their proper locations and machine sewed across them a couple of inches down from the top of the purse. I had planned on two rows of vertical stitching, but my machine just refused to go there.
Last, I added a zipper pull I accidentally found when I was hunting for buckram. It's pewter and from Walmart, of all places!

Et Voila !
Note: My purse is designed to be box shaped at the bottom and flat at the top. For a completely box- shaped form, I would just add a narrow seam along the edges of the sides from the bottom corner to the top. Just a pinch to firm up the squareness of the side edges.
posted by Marie | 3:01 PM
![]()
![]()
0 Comments:
Post a Comment
<< Home